
In October 2020, Studiopress announced that we would need to perform an Atomic Blocks to Genesis Blocks migration for any Genesis website that is using Atomic Blocks.
Over the past 2 years, many Genesis website users have used Atomic Blocks for their websites. Although Studiopress has created a migration tool to move more than 60,000 users to Genesis Blocks, a few extra steps are needed to ensure complete migration.

The first week of November we updated all of our business and personal sites for myself and my team using the steps below with great success. Then, we updated the clients on our monthly website maintenance plan and again, great success.
So, today we’re going to share with you the best way for Atomic Blocks to Genesis Blocks migration.
7 Steps for Atomic Blocks to Genesis Blocks Migration
STEP #1: Check your plugin folder.
The first thing you must do is log into your Genesis website and check your plugin folder. Go to: ADMIN > PLUGINS and if you see this plugin active, then proceed to step #2. If you do not see this plugin OR it’s already inactive, then this article is not for you! Lucky you!! 🙂

STEP #2: Select the Migrate feature.
Next, you’re going to access the migration feature included in the Atomic Blocks plugin. Go to: ADMIN > ATOMIC BLOCKS > MIGRATE

STEP #3: Install and Active Genesis Blocks.
Once you’re on the migration feature page, you will see a page like our screenshot below. Select the button “Install and Activate Genesis Blocks”.

STEP #4: Take a Full Website Backup
Some of your website hosting companies take daily backups, which is great. However, for this migration, we suggest that you take an additional backup at either your host cpanel or use a plugin like UpDraft Plus and store the backup copy at either Amazon s3 or dropbox.
Once you have taken a full backup copy of your entire website, then check “I have backed up my site” > NEXT STEP

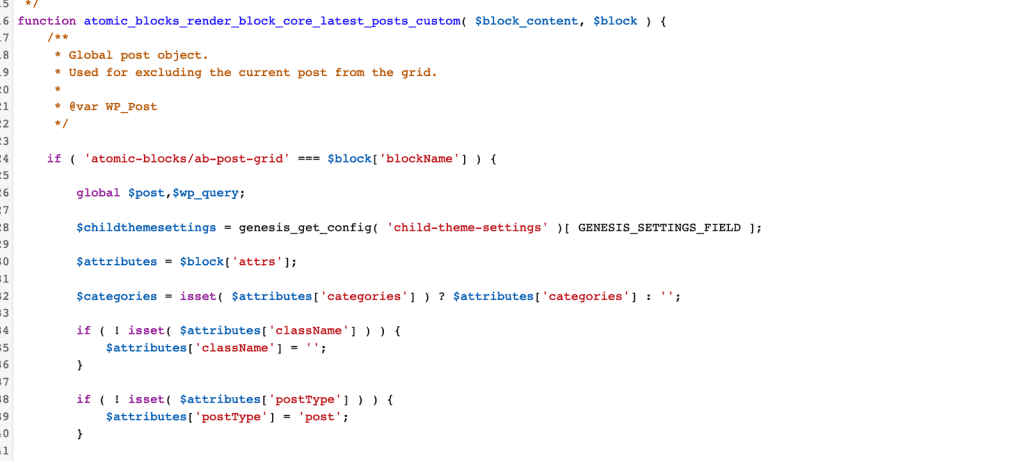
STEP #5: Update CSS and PHP files.
You must update both CSS and php files before proceeding.
CSS FILES TO UPDATE:
- style.css
- lib/gutenberg/atomic-blocks.css
- lib/gutenberg/front-end.css
- lib/gutenberg/style-editor.css
- lib/gutenberg/inline-styles.css
- lib/fse/fse.css
- On all css Replace “ab-” with “gb-” and save changes
PHP FILES TO UPDATE:
- blocks/block-post-grid.php
- Replace “ab-” with “gb-”
- Replace “atomic” with “genesis”
- Save changes
FSE TEMPLATE FILES TO UPDATE:
- All files inside block-templates and block-templates-parts folder

- Replace “ab-” with “gb-”
- Replace “atomic-” with “genesis-”
- Save changes
THEME DEMO FILES:
If you’re using Child Theme Demo, then it will contains atomic block and will need to be updated too:
- All Files under recipe-blogger/config/import/content/
- Replace “ab-” with “gb-”
- Replace “atomic-” with “genesis-”
- Save changes
STEP #6: Continue Migrating
Once all CSS and php files are updated as indicated in step #5, select NEXT STEP.

STEP #7: Finally, you can Migrate!
Select MIGRATE NOW to begin the process of atomic blocks to genesis blocks migration.

After migration is completed, it will automatically deactivate atomic blocks in your plugin menu.

Step #8: Clear your Site Cache.
To ensure you are seeing the latest version of your website, be sure to clear your cache and refresh your browser as needed.
Need help?
We designed this quick Atomic Blocks to Genesis Blocks migration guide so you can use the migration tool and get your site updated ASAP. However, if you’re not comfortable updating CSS or PHP files, you can submit an edit request and we can add you to our next available Friday update spot.


